

“], “filter”: { “nextExceptions”: “img, blockquote, div”, “nextContainsExceptions”: “img, blockquote, a.btn, a.o-button”} }”>
Heading out the door? Read this article on the new Outside+ app available now on iOS devices for members!
>”,”name”:”in-content-cta”,”type”:”link”}}”>Download the app.
I still remember the first time I saw someone do the version of Side Plank (Vasisthasana) that’s found in B.K.S. Iyengar’s classic Light on Yoga. It’s the one where you lift your top leg and wrap your fingers around your big toe. It looked incredibly expansive and spacious. It also looked completely impossible to me at the time.
Side Plank demanded everything that I found super challenging in my early years of practicing yoga. Open hips. Unrestricted hamstrings. Upper body and core strength. I wrote it off as one of several unicorn poses that I kept in my “maybe someday” category and forgot about it.
Months later, I was taking class and following the teacher’s cues and, much to my astonishment, the pose just…happened.
Coming into Side Plank that day taught me several essential lessons about the physical practice of yoga. One is that consistently showing up on my mat and moving through common poses, as I had for years, creates changes in the body. But what happened was a result of more than the stretching and strengthening from my regular yoga practice. It was a result of the teacher’s smart sequencing of poses.
Throughout class, he repeatedly took us into the same shape as Side Plank in different poses, starting with simple postures and working toward those that are more complex. When it came time to attempt the pose, my body was already familiar with the various demands of Side Plank. I could integrate what I’d just learned and experienced rather than simply attempt to mimic a shape without understanding what needed to happen in my body. This type of sequencing is a fundamental principle of teaching yoga although it’s not always practiced by teachers.
Yoga is about so much more than coming into a pose. But it’s also about what coming into a pose can teach you about yourself. What it’s really doing is helping you understand all the ways your body can move, teaching you patience and perseverance, and holding up a mirror to all the thoughts you tell yourself when you’re in a challenging situation.
What Sequencing Has to Do With Learning How to Do a Side Plank
Perhaps the safest and most effective way to practice more complex poses is to move your body through increasingly challenging poses that require the same shapes and actions. Learning how to do a Side Plank is no exception. When your class is structured this way, as a student, you’re more likely to challenge your body in a safe manner. And as a teacher, you’re setting your students up to surprise themselves in their awareness of their bodies and their ability to do what they might not have thought was possible.
If this version of Side Plank isn’t appropriate for you, there are so many other versions of it that are challenging in different ways. Whether you practice Side Plank with your bottom knee down, with your top leg in a Tree Pose shape, or your top leg extended toward the ceiling, the pose offers you a place to work on stretching, strengthening, and challenging various parts of your body. This is one of the reasons why you can practice or teach Side Plank in almost any class.
A Sequence That Teaches You How to Do a Side Plank
There are many different ways to prep your body for any challenging pose. You want to repeat these same elements throughout your practice or the class you teach, including warm-up stretches, standing poses, and balancing and twisting poses. I find it that when I’m cueing students, it’s useful to emphasize no more than two to three of these points. This gives students enough to focus on but not so much that they become distracted or overwhelmed.
The poses that I emphasize when preparing students for how to do a Side Plank repeat the following actions:
- Lengthening the tailbone. This causes you to engage the lower abdominal muscles which helps with stability.
- External rotation of the hips. This helps you take your leg out to the side.
- Stretching the hamstrings. This allows you to straighten your leg.
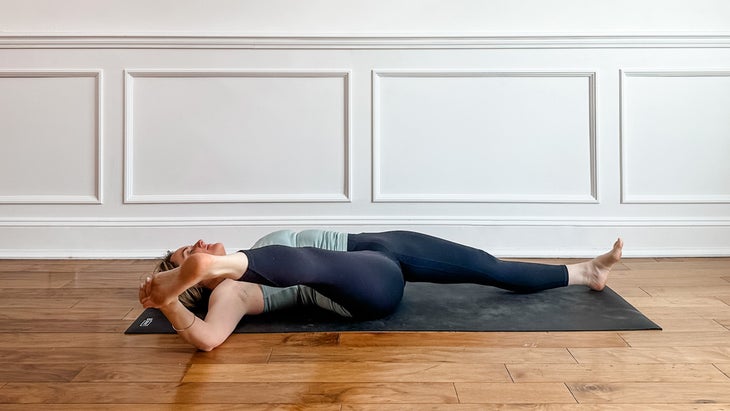
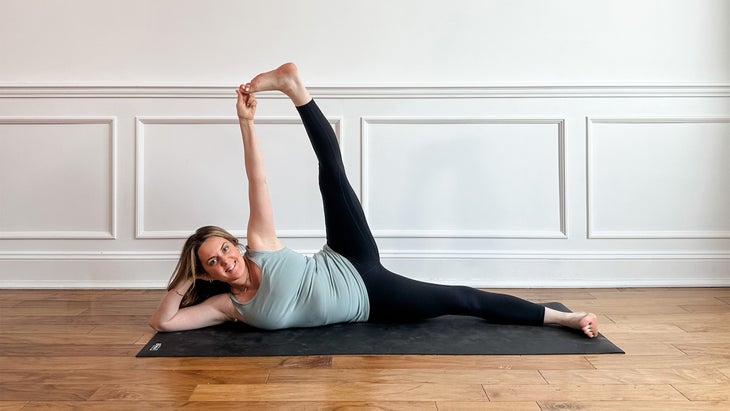
Reclined Extended Hand-to-Big-Toe Pose (Supta Padanghustasana B)
This pose places the legs in the exact shape of Side Plank but without the balancing challenge. Starting class with this supported version of Reclined Extended Hand-to-Big-Toe Pose, without needing to balance, helps you become familiar with the necessary positioning of the body for extended Side Plank. If your hamstrings or hips are tight, bend your knee or keep your leg more forward than out to the side.
Supported Side Plank (Vasisthasana Variation)
Including variations of Side Plank throughout class helps you gradually build up to the extended version. Adding this supported version into the warm-up allows students to practice the actions and muscle engagement that will be needed during more complicated variations of the pose. It also stretches the hips, hamstrings, and side body.
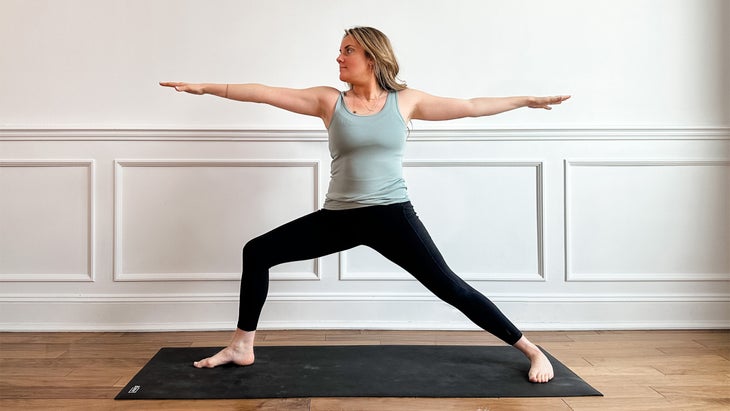
Warrior 2 (Virabhadrasana 2)
Warrior 2 is included in pretty much every vinyasa yoga class. It’s especially helpful for preparing students into Side Plank because the external rotation happening in the hip of your front leg is the exact same shape needed later on in your top leg in Side Plank.
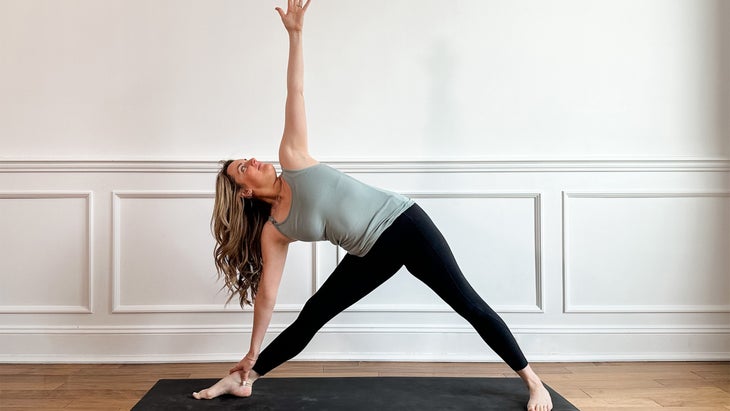
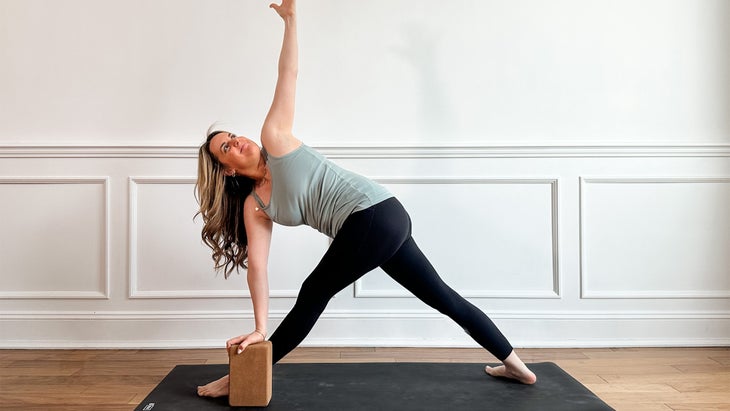
Triangle Pose (Trikonasana)
When you practice Triangle Pose, you focus on two straight legs and two straight arms, which is exactly what’s also needed for the version of Side Plank in which your top leg reaches toward the ceiling. Plus, it teaches you to lengthen your tailbone toward your back heel, which is a key action for this pose as it engages the muscles of your lower abdomen which in turn helps steady your balance. This is a perfect example of how common poses can help students learn the shape and engagement they need for other poses.
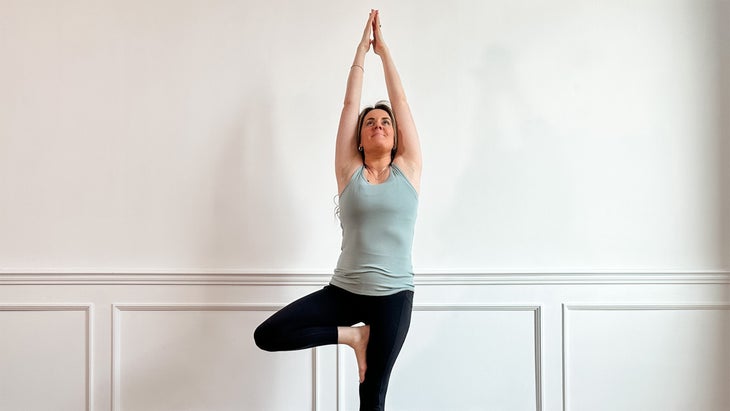
Tree Pose into Hand-to-Big-Toe Pose B (Vrksasana into Padanghustasana B)
In Tree Pose, your lifted leg moves into external rotation with the knee bent. Then, the leg stays in that rotation but moves into the straightened position for Padanghustasana B. Teaching the transition between these two poses gives students a place to practice exactly what needs to happen in the peak pose later on but in a way that feels a little more familiar and accessible. Holding each of these poses for a few breaths on the same standing leg can be challenging, so a sense of humor always helps when you or a student falls out of the pose.
Revolved Triangle Pose (Parivrtta Trikonasana)
This is one of the most challenging standing twist poses and requires proper warming up throughout class for students to move into it in a way that feels accessible. The focus on straight leg work earlier in this sequence helps do exactly that. Plus, Revolved Triangle Pose challenges students to use the muscles of the upper back to open the chest fully. Although this isn’t one of the specific teaching actions typically cued with Side Plank, it’s still a key action that needs to happen in order to find Side Plank later on.
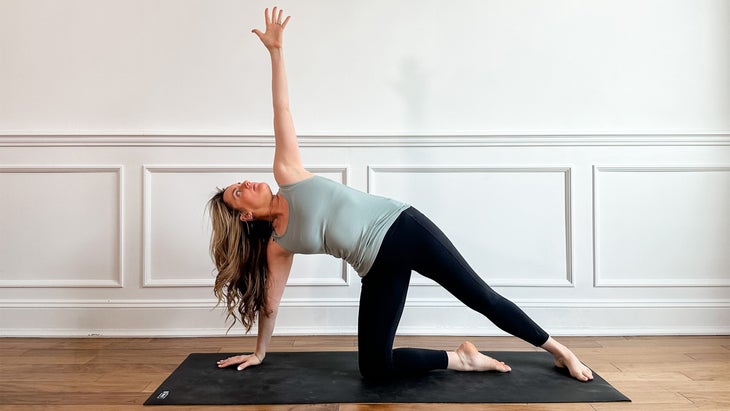
Side Lying Pose (Anantasana)
This is such a fun pose! It’s not often taught in vinyasa classes but Anantasana, also known as Vishnu’s Couch, works perfectly in a Side Plank sequence because it’s basically the exact same pose without the arm balance component. Placing this pose towards the end of the sequence, just before actually doing the peak, gives students an opportunity to practice everything you’ve been working up to before experiencing it for the final time in Side Plank.
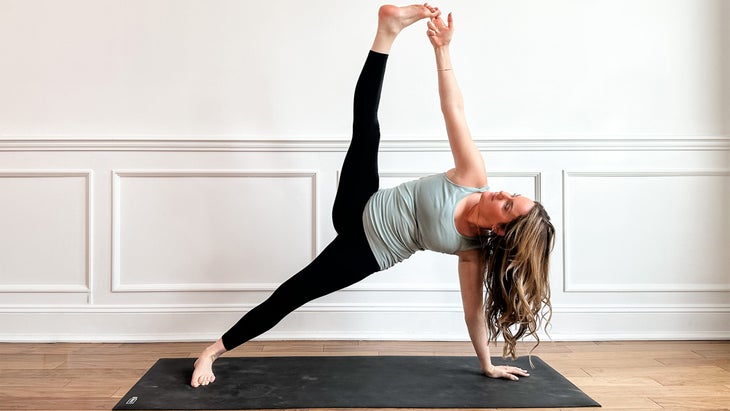
Extended Side Plank (Vasisthasana)
The trick isn’t just making the shape with your body. It’s how to move in and out of it that is the secret. In this sequence, you start in Side Plank with your legs together, then move your top leg into the familiar Tree Pose before taking the same action we’ve done throughout class, which is straightening your top leg in external rotation.
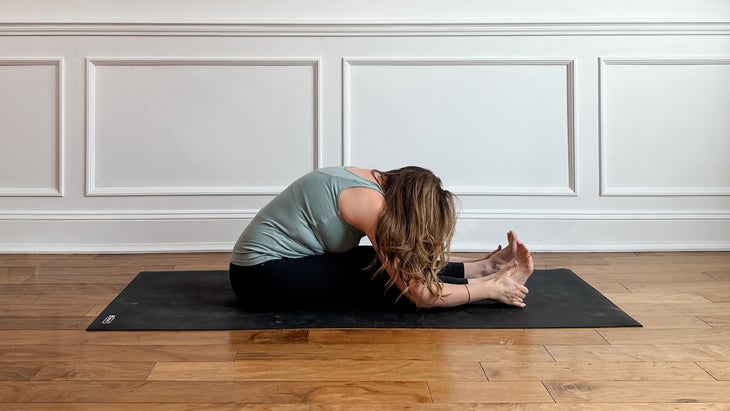
Seated Forward Bend (Paschimottanasana)
After a class that focuses on lengthening out and away from center and also stretching the hamstrings, it’s a perfect time to practice a pose that helps you turn inward and counter all the expansion you’ve been practicing. Seated Forward Bend does exactly that. Stay here for 10-15 breaths to allow the nervous system space to calm down.
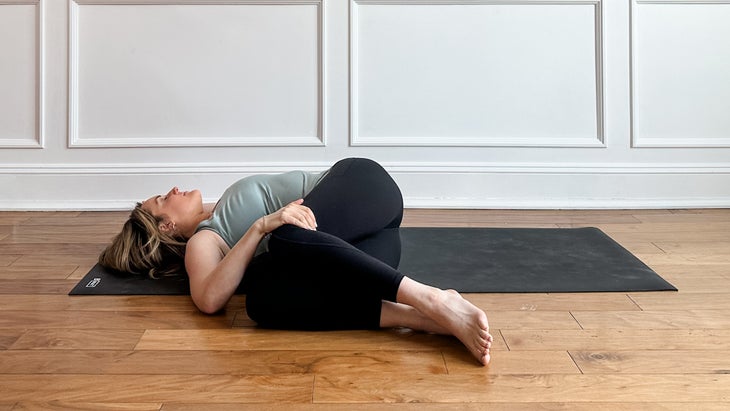
Reclined Spinal Twist (Supta Matsyendrasana)
Side Plank requires so much engagement of the core muscles. This pose relaxes that tension and allows you to be supported. Incorporating this twist into your cool down is a great way for both your body and mind to find a sense of ease and release.
About Our Contributor
Kate Lombardo is an international yoga teacher trainer and wellness business strategist. She has taught and led in-person training programs for years prior to expanding her reach virtually as the director of YogaRenew, where she leads online yoga teacher trainings. She’s also a vinyasa yoga sequencing nerd and could spend hours talking about meditation and positive psychology as well as business strategy and money mindset. Kate believes happiness lies in the space between seeking success and being of service.


